This article will present steps to utilize ESP32 in cotrolling a lamp using voice commands.

Supplies
- A ESP32 device: Mercado Livre, Amazon;
- A Relay with 5v trigger: Mercado Livre, Amazon;
- A computer to host the MQTT broker and capture audio from a microfone.
Sending Messages with MQTT
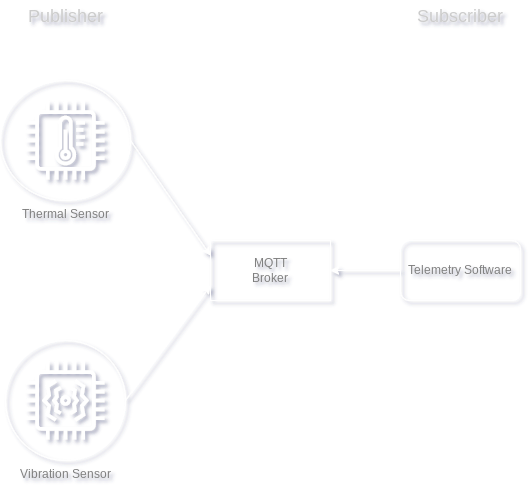
To create a messaging system that connect the PC and ESP32 device it is going to be used the MQTT (Message Queuing Telemetry Transport) Protocol.

The MQTT is a lightweight protocol that aims to solve telemetry problems for small sensors and mobile devices through a TCP/IP network. This protocol implements the Publisher-Subscriber model, in which elements send information to a topic (Publisher) and elements consult new information on a topic (Subscriber). There is also a middleman responsible to host and manage data queues, called Broker on this protocol.
So the first step is to install the Mosquitto MQTT broker on a machine:
- Debian/Ubuntu:
sudo apt install mosquitto - Windows: https://mosquitto.org/download/
A Simple Speech Recognition for Voice Commands
With the MQTT broker installed it is possible to create a python script that will capture audio from a microphone, check the voice commands that were said and publish the desired state of the lamp to the controller that will be shown on the next section.
The script will need the following dependencies:
1
pip install SpeechRecognition paho-mqtt
With the dependencies installed we are able to run the following script:
1
2
3
4
5
6
7
8
9
10
11
12
13
14
15
16
17
18
19
20
21
22
23
24
25
26
27
import speech_recognition as sr     # import the library
import paho.mqtt.client as mqtt

print(sr.Microphone.list_microphone_names())


client = mqtt.Client(client_id = 'speech', protocol = mqtt.MQTTv31) # starts mqtt client
client.connect("BROKER_IP", 1883) # connects to broker

r = sr.Recognizer()                 # initialize recognizer
with sr.Microphone() as source:     # mention source it will be either Microphone or audio files.
    print("Say the voice command: ")

    while True:
        r.adjust_for_ambient_noise(source)

        audio = r.listen(source, phrase_time_limit=5)        # listen to the source
        try:
            text = r.recognize_google(audio, language="en-US")    # use recognizer to convert our audio into text part.
            print("{}".format(text))
            if text == "turn on the lamp":
                client.publish("lamp0/state","1",qos=0)
            elif text == "turn off the lamp":
                client.publish("lamp0/state","0",qos=0)

        except:
            print("Sorry could not recognize your words, please repeat")    # In case of voice not recognized  clearly
Making ESP32 Receive Voice Commands
Configuring the IDE
The fist thing to do here is to configure the ArduinoIDE to work with ESP32.
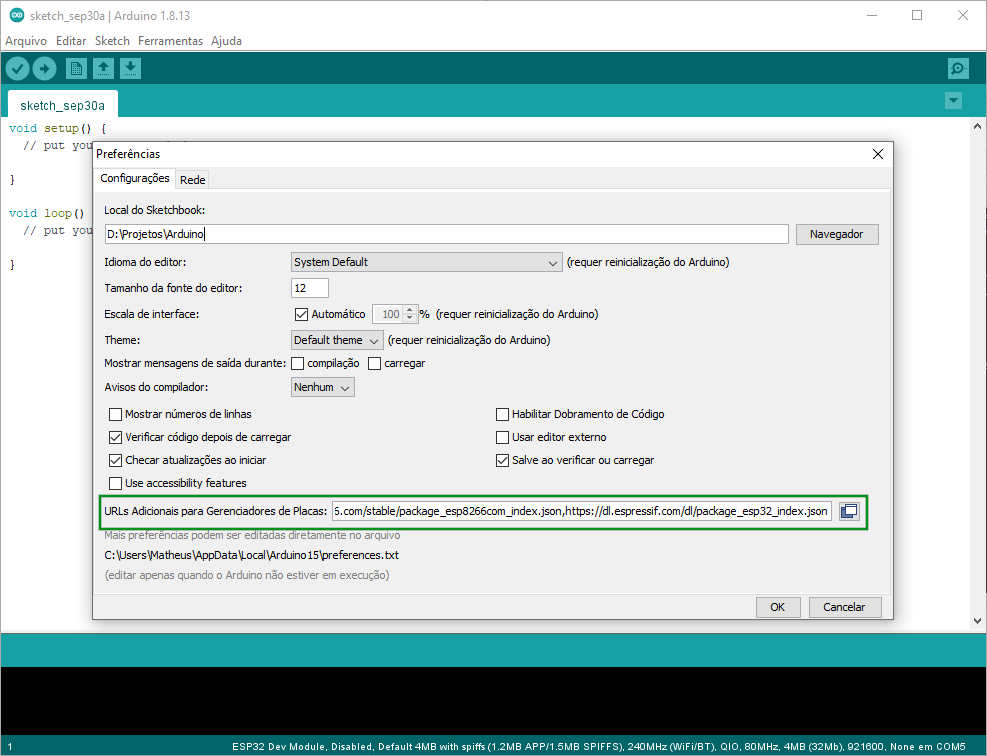
Although this device is not a Arduino device, there are some compatibility packages that allows programming using this IDE. To gain access to these packages it is necessary to include the following lines in the field present on Files > Preferences > Additional URLs, as the following image:

1
https://arduino.esp8266.com/stable/package_esp8266com_index.json,https://dl.espressif.com/dl/package_esp32_index.json
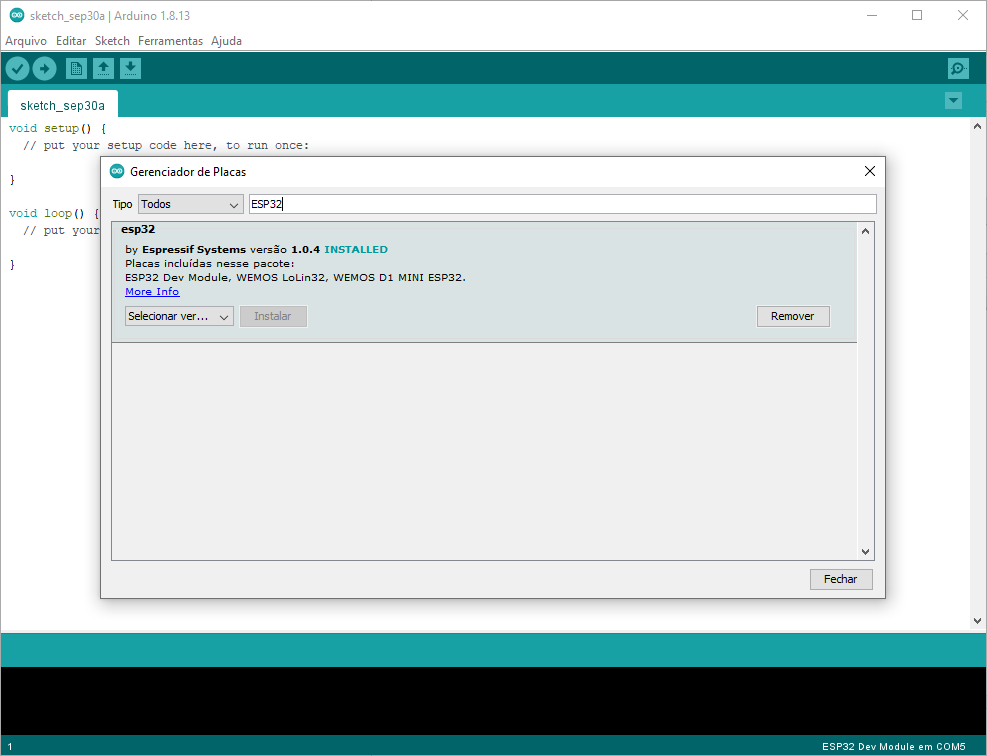
After adding the Urls above, it is possible to install the ESP32 module by accessing Tools > Boards > Board Manager. After clicking on Board Manager a window will open and we can write ESP32 on the filter as following:

After installing the module we have to select ESP32 as the target board for the IDE, we can do so by accessing the following path Tools > Boards > ESP32 Arduino > ESP32 Dev Module.

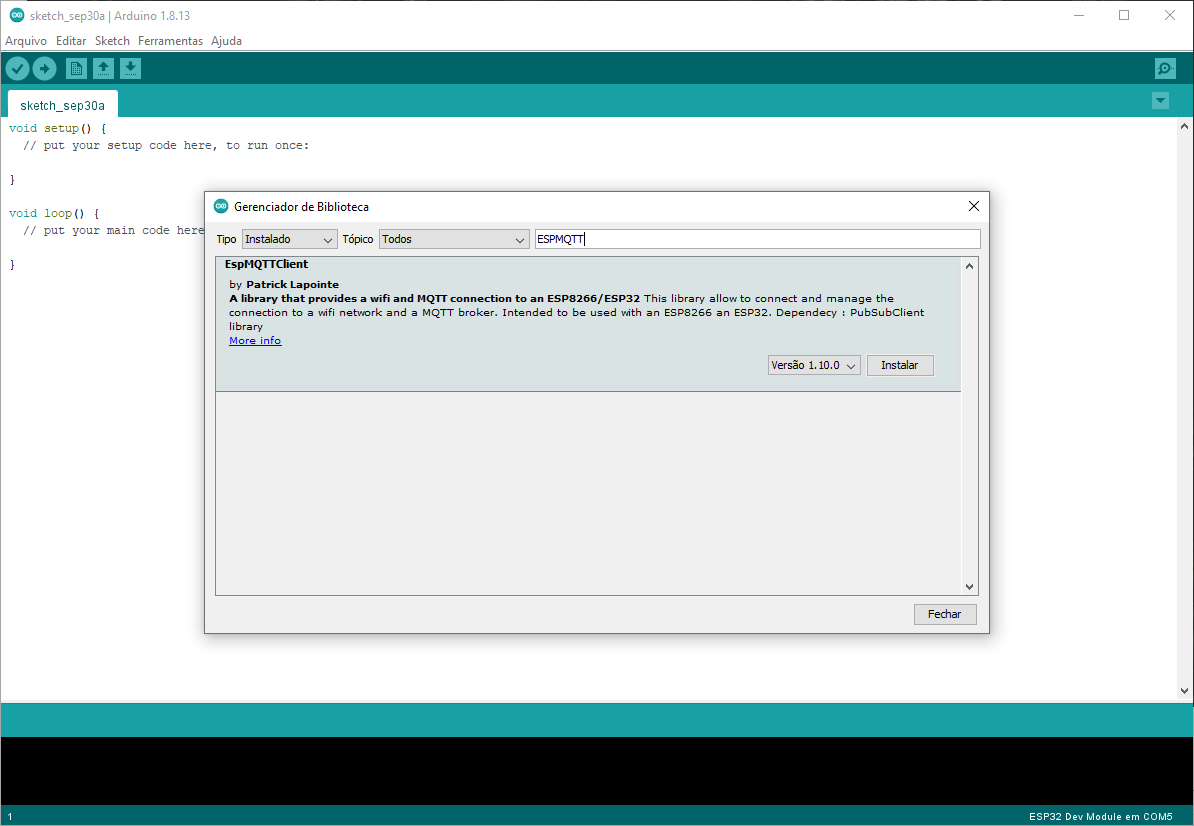
With the board configured, it is still necessary to install the MQTT package for ESP32 devices. To do so we can access Tools > Manage Libraries and then search for ESPMQTT as follows:

Embedded Code
After finishing the IDE setup above we can go to the code that will control a Relay from MQTT messages. On the code bellow there are three itens that need to be replaced:
- WIFI_SSID: It should be the name of you wifi network
- WIFI_PASSWORD: It should be your wifi password
- BROKER_IP: It should be the IP of the pc with mosquitto installed.
1
2
3
4
5
6
7
8
9
10
11
12
13
14
15
16
17
18
19
20
21
22
23
24
25
26
27
28
29
30
31
32
33
34
35
36
37
38
39
40
41
42
43
44
45
46
47
48
49
50
51
/*
  SimpleMQTTClient.c
  The purpose of this exemple is to illustrate a simple handling of MQTT and Wifi connection.
  Once it connects successfully to a Wifi network and a MQTT broker, it subscribe to a topic and send a message to it.
  It will also send a message delayed 5 seconds later.
*/

#include "EspMQTTClient.h"

EspMQTTClient client(
    "WIFI_SSID",
    "WIFI_PASSWORD",
    "BROKER_IP",    // MQTT Broker server ip
    "",               // Can be omitted if not needed
    "",               // Can be omitted if not needed
    "esp32",          // Client name that uniquely identify your device
    1883              // The MQTT port, default to 1883. this line can be omitted
);

int outputPin = 15; // GPIO Pin for relay control

void setup()
{
    Serial.begin(9600);

    // Optionnal functionnalities of EspMQTTClient :
    client.enableDebuggingMessages(); // Enable debugging messages sent to serial output
    client.enableHTTPWebUpdater(); // Enable the web updater. User and password default to values of MQTTUsername and MQTTPassword. These can be overrited with enableHTTPWebUpdater("user", "password").
    client.enableLastWillMessage("TestClient/lastwill", "I am going offline");  // You can activate the retain flag by setting the third parameter to true
    pinMode(outputPin, OUTPUT);
    digitalWrite(outputPin, HIGH);
}

void subscriptionCallBack(const String & payload)
{
    digitalWrite(outputPin, (payload == "0")?(HIGH):(LOW));
    Serial.print("outputPin: ");
    Serial.println(payload);
}

// This function is called once everything is connected (Wifi and MQTT)
void onConnectionEstablished()
{
    // Subscribe to "lamp0/state" and display received message to Serial
    client.subscribe("lamp0/state", subscriptionCallBack);
}

void loop()
{
    client.loop();
}
Result
After compiling the code on the ESP32 board, we can run the python code provided on this post to begin controlling devices with voice command.
In case of any doubts or ideas send me a email,
Matheus Barcelos de Oliveira
Computer Engineer